General

Pictures uploaded to photo gallery should be resized so that the file size is optimised for downloading from a web site. If you have a lot of pictures, there are ways to resize an entire folder of images in one go.
The instructions below are for Apple Mac users.
- First, download and install iResize: http://www.macupdate.com/app/mac/13039/iresize
- Once installed, click on the icon to run the program
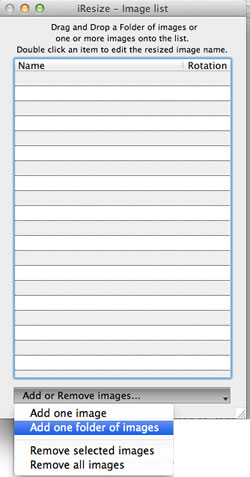
- From the drop down, click on 'Add one folder of images'

- Now, navigate to the folder on your computer which contains the pictures that you would like to resize and then click on the 'Choose' button
- Your images will now load in iResize
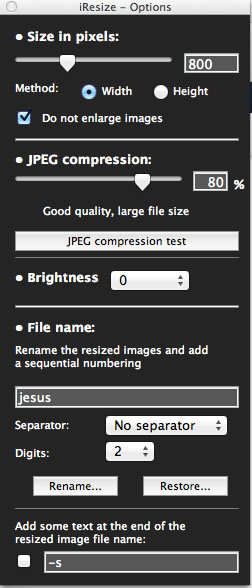
- Now, in the settings window, change the values to resize your images to the appropriate size. We suggest changing the image width 'size in pixels' to '800' and move the 'JPEG Compression' slider to '80%'

- Once you're happy with the settings, click on the 'Resize All...' button
- iResize will now ask you where you would like to save the resized images. We suggest creating a new folder on your computer for this. Once you have navigated to the folder, click on the 'Resize all here' button
- iResize will now resize all of your images and save them into the new folder.
If you have tried adding a PayPal button into a Joomla article but it has displayed, on your site, too small - this trick is for you.
The code that you copied from PayPal will look something like this:
<form action="https://www.paypal.com/cgi-bin/webscr" method="post" target="_top">
<input type="hidden" name="cmd" value="_s-xclick">
<input type="hidden" name="hosted_button_id" value="GQT7EVE65B7NG">
<input type="image" src="/https://www.paypalobjects.com/en_US/GB/i/btn/btn_buynowCC_LG.gif" border="0" name="submit" alt="PayPal – The safer, easier way to pay online.">
<img alt="" border="0" src="/https://www.paypalobjects.com/en_GB/i/scr/pixel.gif" width="1" height="1">
</form>
To increase the size of the PayPal button on your site, just change the code to
<form action="https://www.paypal.com/cgi-bin/webscr" method="post" target="_top">
<input type="hidden" name="cmd" value="_s-xclick">
<input type="hidden" name="hosted_button_id" value="GQT7EVE65B7NG">
<input type="image" style="height:47px;" src="/https://www.paypalobjects.com/en_US/GB/i/btn/btn_buynowCC_LG.gif" border="0" name="submit" alt="PayPal – The safer, easier way to pay online.">
<img alt="" border="0" src="/https://www.paypalobjects.com/en_GB/i/scr/pixel.gif" width="1" height="1">
</form>
The only change is the addition of style="height:47px;" on the fourth line. Add it in to your code, save the article and see if it has worked for you.
We much prefer to use your own pictures on your web site, rather than using stock images. The pictures give your customers more confidence in your work and it allows you to show off your work.
Once you have gathered together a group of pictures, you can send them to us in a couple of different ways.
If you have less than 10 pictures, it's probably easier just to e-mail these over to us. Just attach the files to an e-mail and send it to info@favershamdesigns.co.uk
If you have more than 10 pictures, you can use Dropbox for free.
Sending Us Pictures Using Dropbox
Dropbox is a free file sharing service. You do not need to install anything on your computer and it's a really easy way to send lots of files or large files, that can't be sent via e-mail.
To register (for free) to Dropbox, visit this page: https://www.dropbox.com/register
Once you've registered, follow these steps to upload your files:
- Login to the Dropbox web site
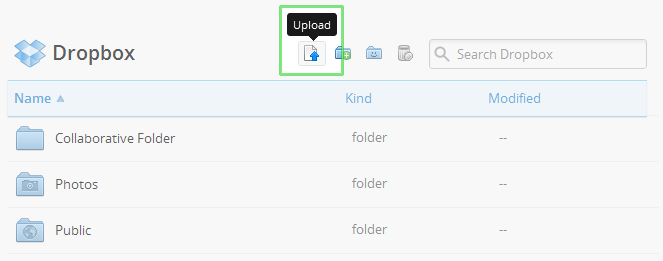
- Click the Upload button from the very top of the window

- A window will appear. Click the Choose File button and then select the file on your computer that you'd like to add to your Dropbox
- Choose as many files as you like, and then click the Start Upload button.
Once you have uploaded your files, you will need to share them with us. To do this, follow these instructions and when you are asked to enter the e-mail address of the person that you want to share the files with, enter info@favershamdesigns.co.uk
It is sometimes necessary to connect to your web site using the FTP protocol. This allows you to directly upload documents and images to your site.
We recommend FileZilla, a free FTP program that works on Windows and Mac machines: https://www.filezilla-project.org
- Once downloaded and installed, click on the 'FileZilla' icon to launch the program
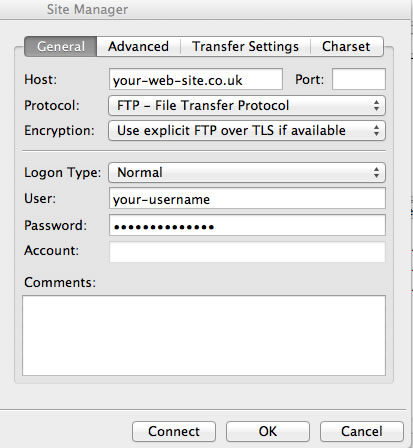
- Once open, click on 'File' from the toolbar and then click on 'Site Manager...'
- A new window will open. Click on the 'New Site' button and enter a name for the site
- In the right-hand side of the screen, enter the following details:
- Host - enter your web site address without the www. prefix e.g. your-web-site.co.uk
- User - enter your FTP username. This is different to any other username that we've provided you so please get in touch if you do not have this
- Password - enter your FTP password

- You can now click on the 'Connect' button to connect to your web site via FTP!
The cache is a store of temporary files related to your web site. Sometimes, if your web site is behaving strangely, clearing the cache can resolve the problems.
To clear your site's cache, just follow these steps:
- Log into your site's administration panel, usually at www.your-web-site.co.uk/administrator
- Click on the 'System' menu item (top left-hand side of the screen) and then click on 'Clear Cache'
- A new page will be displayed and a list of items will be shown. Tick the top box, to select all of the items, and then click on the 'Delete' button and then go to the next step. If no items are listed, do not worry just carry on to the next step.
- Now click on the 'System' menu again and this time click on 'Purge Expired Cache'
- Once the page has loaded, click on the 'Purge expired' button
- Your site's cache has now been cleared. Go back to the front end of your web site - www.your-web-site.co.uk - and refresh the page. Hopefully the problems that you were experiencing have disappeared. If not, let us know!
Did you know that you can change your username on Twitter? This can be really useful if you've built up a large number of followers for your business Twitter account but you then change the business name.
To change your username on Twitter, follow these steps:
- Log-in to your Twitter account at www.twitter.com
- Once in, click on the cog symbol in the top-right hand corner of the page and from the drop-down menu, click on 'Settings'
- The first box displayed is 'Username'. In here, type in what you would like your new username to be
- The system will check to see if that name has already been taken but if not, you can have it as your username.
- Done!
If you would like to provide access for us, or someone else, to manage your Google+ page, you will need to follow these steps:
- Log into your Google+ page as normal. If you can't find the link that you normally use, go to: https://www.google.co.uk/business/placesforbusiness/
- Once logged in, your Google+ page should be displayed. In the top-right hand corner there should be a cog icon. If you click on it, a list of items will be displayed. Click on the 'Settings' link
- A new page will load which will have a light-grey coloured banner across the top. On here there is a 'Managers' link. Click on this
- To add a new manager, click on the 'Add managers' button at the top of the page
- A dialog box will appear. Enter our e-mail address (favershamdesigns@gmail.com) and then click on the 'Invite' button.
Now that you have completed these steps, please e-mail us at support@favershamdesigns.co.uk to let us know that the changes have been made.
We should now be able to log in and start posting message on your behalf.
If your credit or debit card has expired, you will need to add a new one to your PayPal account to make online payments. Follow these steps to add a new card to your account:
- Log into PayPal at www.paypal.co.uk
- From the main menu tabs, click on 'Add Funds'
- The 'Add Funds to Your PayPal Account' page is displayed. Click on the 'any card' link near the top of the page.
- The 'Add Debit or Credit Card' page is displayed. Enter your details and then click on the 'Add Card' button.
The new card should be added to your account and you will be able to make payments through PayPal, and any funds not available in your PayPal account, will be deducted from the newly added card.
Warning: count(): Parameter must be an array or an object that implements Countable in /home/favdes/public_html/components/com_faqbookpro/views/category/tmpl/categorycontent.php on line 36

